Hippo Die Stamp and Die Set - Rubbernecker Stamps - Birthday Card
Hello Everyone! Thank you so much for stopping by my blog! I hope you get some inspiration and pick up some new techniques.
I'm so excited to announce that I have been asked to be on the Rubbernecker Design Team! I am so thrilled to be on this new adventure. My blog posts will be a little different than previous ones as I will be doing step by step instructions on this team.
Sometimes you see a stamp set and you immediately get a clear image of how you want to make the card! Well that sometime was when I saw the Hippo Set and Hippo Die Set. I'm so excited that what was in my head came to fruition in this card!
It's Rubbernecker's birthday month so the theme is "Birthday". I decided to use the Hippo Set and Hippo Die set as well as some other Rubbernecker dies and stencils.
Here is my completed card. Below you will find step by step instructions.


- Use your Misti or other stamp platform to stamp out your images using Gina K Almalgam Ink.
- I use Copic X-Press It paper for all of my Copic coloring.

- Color your images with alcohol markers of your choice, I use Copic's.
- The combinations I used are as follows:
- Hippo's W7 W5 W3 W1 W00
- Cheeks R30
- Heart R22
- I ended up not using the balloon gift but the Copic combinations are as follows:
- Blue B37 B24 B23
- Yellow Y08 Y06 Y02 Y11
- Green YG17 YG13 YG11
- Red R89 R39 R35

- For easer stenciling I use Ranger's Make Art Station that way the stencil doesn't move when you are inking.
- Cut a piece of card stock at 4 x 8 1/2 then lay your Cloud Stencil down and secure with magnets.
- Take your blending brush and using Color Fuse - Sierra, blend it on your card stock. Turning the stencil on a different side for each line.
- A little tip for you before you blend your ink on your card stock do a little test rub on the Make Art mat that way any excess ink won't blob on your paper.

- Take your Slimline OPC Wavy die and lay it down on your finished sky as show above. I secure washie tape on the sides of the die so that it doesn't move when going through your die cut machine.

- Die cut all your Hippos and anything else you may have colored out so you can have your dies already to place on your card when figuring out the layout.

- Die cut your Small Butterflies in different colors, Grass #2 in three different shade of green and Tiny Flower Buds in different colors.
- Play with the placement of all of your images and die cuts until your happy with where they are.
- A little tip for you is take a picture of your placement so that when you have to move them to glue you remember where they go.

- For the grass place a dot of glue on the top bottom of each piece and adhere as shown below.

- Flip your Wavy die over and glue the grass onto the back overlapping them as you go.
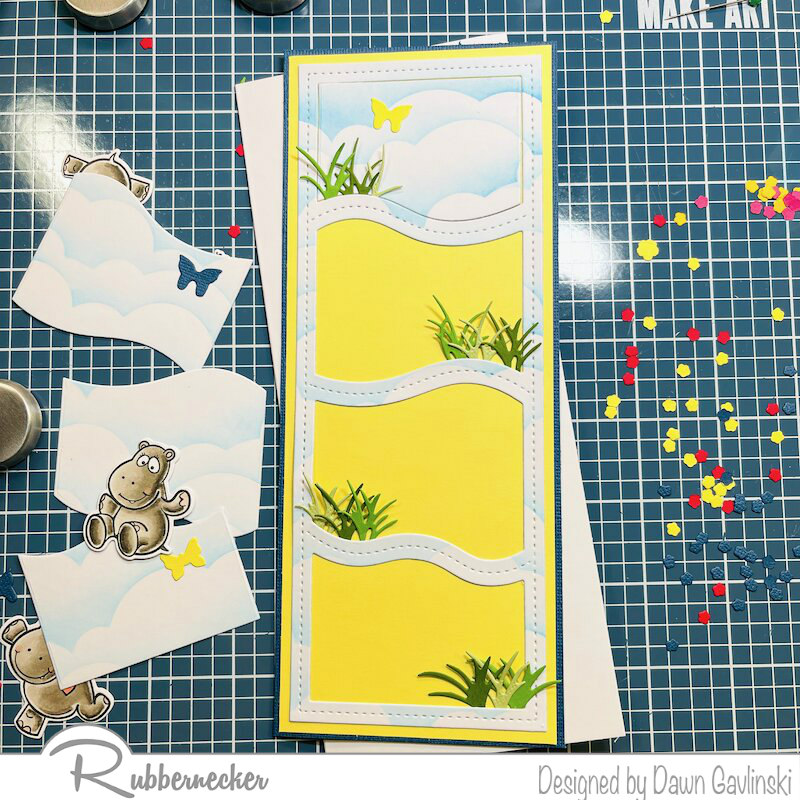
- For a more finished look double mat your die onto your card base as well as your sentiment.
- Cut card stock at 8 1/4 x 7 then score on the 7 inch side at 3 1/2 and that will give you your card base.
Below you will find links to all of the products I used to make this card.
The following items have affiliate links. I use affiliate links so I can continue to make cards for you.
I buy all of my Copic Markers and Refills from
Violeta-Ink.com. Violeta Ink donates a portion of every purchase to Crafts for Paws.


110LB Card Stock Neena Solar White
Thank you so much for stopping by! I hope to catch you on my next post!
Crafty Hugs,
Dawn


Absolutely gorgeous and so love this die. Fabulous cute stamp Dawn. x
ReplyDeleteThank you so much Annie!!!
Delete